




Genomgång av kontrollprocedurer för resonant evakuering: Alla Hiss-noder och nivå 2-nyckelkortet
 PlayStation
 Xbox
Xbox Steam
SteamI ”Evakueringsprocedurer” slutar Control Resonant att hålla dig i handen. Här introduceras bepansrade fiender, läkande Hiss-kluster och ”Dominance”-förstärkningen som präglar resten av kampanjen, och det avslutas med nyckelkortet på nivå 2 som öppnar en rad dörrar utspridda över alla zoner du redan har klarat. Tre Hiss-noder står mellan dig och evakueringsbyggnaden, och för att nå en av dem krävs ett Power Core-relä.
Översikt över uppdraget ”Evakueringsprocedurer”
Detta är det andra uppdraget i kapitlet ”Contain the Crisis”. Det startar automatiskt så fort Zoe har avslutat sin genomgång i Watchtower, vilket innebär att det delar sitt första mål med slutet av det föregående uppdraget.
Kapitel | ”Contain the Crisis” |
Startplats | Central, Vakttornet |
Krav | Utlöses av Zoes genomgång i Vakttornet under ”Välkommen till Manhattan” |
Namngivna fiender | Hiss Transporter, Hiss Distorted |
Låser upp | Arishs genomgång, Dominance |
Belöningar | 1 levande skärva, agentuniform, nyckelkort nivå 2, trofé för räddningsuppdrag |
Den fullständiga kampanjordningen för alla tre uppdragskedjorna finns i genomgångshubben för Control Resonant. Om nyckelkortet för nivå 1 fortfarande ligger på bordet beskrivs hur du får tag på det i genomgången för Control Resonant: Välkommen till Manhattan.
Alla mål för evakueringsprocedurerna

- Skaffa ett säkerhetsnyckelkort
- Nå evakueringszonen
- Hitta källan till skakningarna
- Leta reda på den överlevande
- Få ut Arish levande
- Fly från byggnaden
Det första målet är samma steg som avslutar ”Välkommen till Manhattan”, så det fullbordas så fort du plockar upp nyckelkortet för nivå 1.
Innan du lämnar fältkontoret

Fältkontoret är en knutpunkt som du kommer att återvända till flera gånger, och det är värt att ägna tjugo minuter åt det nu.
Två resurslådor finns där inne: en bredvid mittbordet och en bredvid bordet med bandspelarna. En garderob finns nära pelaren vid trappan på vänster sida när du tittar in från ingången. På bordet nära ingången ligger en checklista för fördelning av förnödenheter.
På bordet på vänster sida av rummet förvaras rapporter om varje resonansvarelse du dödar. Just nu har du en, ”Fältforskning om resonansvarelse: RE-ZD”, om konstnären.
På skrivbordet bredvid resurslådan ligger två snabbbilder, som är ledtrådar till sidouppdraget ”Freeze Frame”.
Utanför ger din nya behörighetsnivå 1 dig tillgång till fältsjukhuset och säkerhetsstationen, där det finns samlarobjekt. Det finns också en ikon för en viktig person på kartan öster om fältkontorets område: bege dig till den blå byggnaden nära muren som lyser gult. Det är fältpanoptikonet, och när du pratar med Langston där inne startar uppdraget ”Panopticon Service Request”. Hans samlarobjekt, ”Langstons Beat Poetry #27”, ligger bredvid honom.
Ta dig till evakueringszonen

Lämna säkerhetskontrollen, sväng vänster och följ gatan till skylten som pekar mot evakueringszonen. Den leder till en stor mur med en blå dörr på vänster sida.
Ett arenamöte utlöses på vägen, vilket introducerar Hiss Clusters. Dessa svävande resonansbollar läker alla Hiss i närheten, och de kommer att få en vanlig strid att ta tre gånger så lång tid. Döda dem först, varje gång, under resten av spelet.
När du klarar den här striden låser du upp Dominance, en status du får när du avrättar en fiende. När den är aktiv ökar den primär närstridsskada med 100 % och sekundär med 50 %, och fiender som dödas under dess inverkan släpper mer hälsa. Den effektivaste strategin är att bygga upp ”Falter” på en svag Hiss-soldat, avrätta den och sedan använda effekten på de tunga fienderna. ”Dominance”-klot dyker också upp i världen och ger statusen när du plockar upp dem.
Gå igenom kontrollpunkten i evakueringszonen. På ett bord inne finns ”Formal Complaint”, och på ett annat bord längst bort finns ”Sinkhole Transcript”.
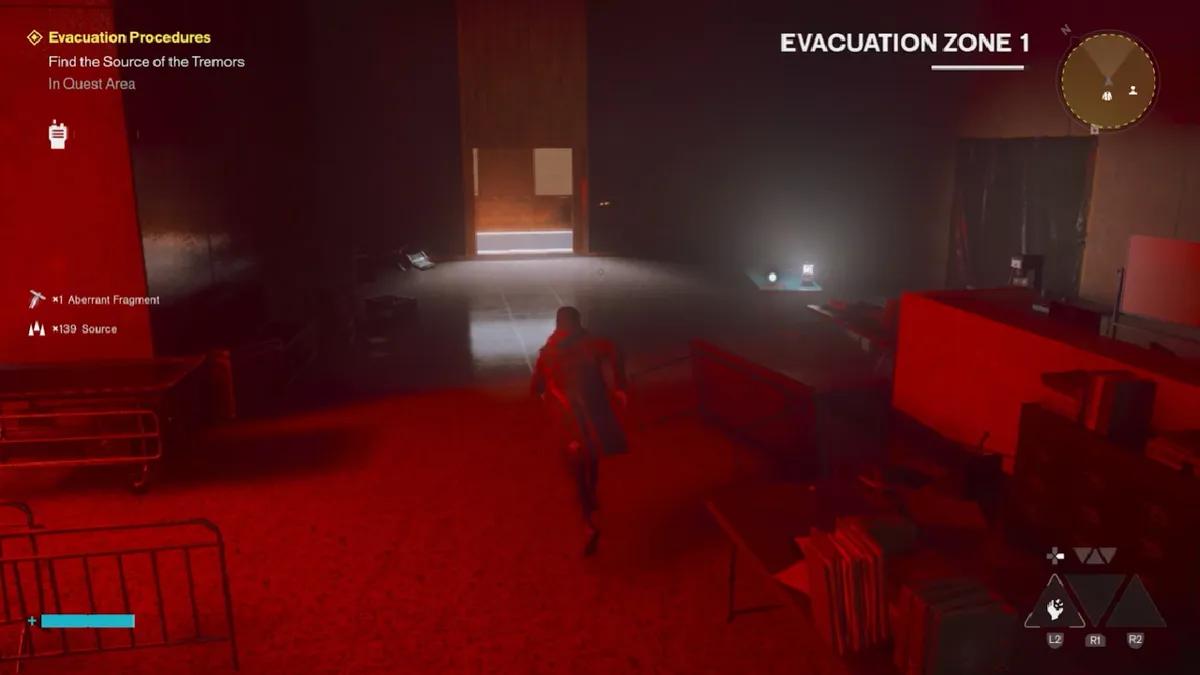
Hitta källan till skakningarna

Evakueringszonen är mörk och dimmig, vilket är spelets sätt att visa hur olika zonerna kan upplevas.
Lås upp kartan över evakueringszonen
Ikonen för kartpaketet finns nära zonens centrum, men en mur blockerar den direkta vägen. Klättra upp på den mindre byggnaden mittemot muren, hoppa från dess hörn till byggnaden med strålkastarna, klättra upp till toppen och ta dig över räcket till själva muren.
Där uppe finns sinkhålet, som du kan rapportera, och en fri utsikt mot evakueringsplatsen, som du också kan rapportera. En skakning drabbar Dylan mitt i samtalet.
Hoppa ner på gatan, där en Hiss-transportör troligen kommer att hitta dig.
Hiss Transporter. En Hiss-fiende formad som en halv stadsbuss som genererar underhuggare som kallas Hiss Passengers. Den har mycket hälsa men bär på Breakable Parts, synliga som klumpar av Hiss på sidorna. Att förstöra en Breakable Part orsakar stor skada och ger Falter. Den teleporterar sig runt i området, så spåra den efter att den försvunnit och bekämpa den i luften om möjligt, eftersom dess markattack orsakar sprängskada och brännskador. Maximera dess Falter för en avrättning.
Fortsätt österut till Map Kit-området och titta på byggnaderna på gatans norra sida. Använd utskottet vid tidningskiosken, hoppa över gapet till hissen och klättra upp på taket. Här uppe finns både en orienteringspunkt och en snabbresedörr, så aktivera dörren innan du gör något annat.
De tre sensorerna syns alla från detta tak. En ligger alldeles i närheten österut. Den andra ligger tvärs över gatan i nordväst, markerad med ett blinkande rött ljus. Den tredje ligger norrut, tvärs över en gränd på ett annat tak. Aktivera alla tre och sätt på kartstolpen.
Omväg via försäljare och låda
Öster om pylon, över hustaken och ner i gränden bakom byggnaderna, finns en orienteringspunkt och en glassbil med ett av de där halvsmälta tecknade maskothuvudena. Den bilen är försäljaren i evakueringszonen, där Source köper uppgraderingsmaterial. Varje zon har en sådan.
Bakom försäljaren finns en stor resurslåda värd 1 hälsouppgraderingspoäng.
När du närmar dig detta område startar en strid med en grupp Heavies. När du har rensat området tas barrikaderna bort från butikerna på gatunivå, och det lönar sig att gå in i dem för att hitta lådor, samlarobjekt och ett konstgalleripussel med en generös belöning.
Hur man förstör alla tre Hiss-noderna

Dörrarna till evakueringsplatsen är förseglade bakom en Hiss-barriär som drivs av tre Hiss-noder. Röda trådar i luften leder till var och en av dem. Noderna i sig kan inte slå tillbaka, så svårigheten ligger helt och hållet i eskorterna runt dem.
Innan du börjar finns det loot i området utanför ingången. På ett bord vid dörren till evakueringsplatsen ligger ett evakueringsformulär. I byggnaden bredvid flaggraderna finns en resurslåda i hörnet och ett PR-videomanus på hyllan. I den upphängda gula byggnaden närmare evakueringsplatsen finns ytterligare en resurslåda till höger om de blå skåpen, samt 2 stycken snabbfotografier, en daglig kommunikationslogg och PR-riktlinjer angående mönstrade tunnelbanetunnlar.
Nod ett. Mitt i det öppna området framför evakueringsbyggnaden. Den mest utsatta av de tre, så räkna med sällskap.
Nod två, norrut. Klättra upp på den första byggnadsgruppen norrut och leta efter ett tak som ligger inbäddat mellan två högre byggnader där tråden slutar. Det är här pansrade fiender börjar dyka upp. Pansaret måste brytas innan du kan påverka deras hälsa, och det är svagt mot trubbiga skador, vilket din första stridsförmåga ger oavsett vilken du valde. Om du valde Crush som sekundär Aberrant-form fungerar det också. Ta hand om eskorten, hoppa sedan över gatan och förstör noden.

Nod tre, söderut. Tråden löper mot ett rödbelyst område bakom höga byggnader, och det är besvärligt att närma sig från den avspärrade gatan. Sväng istället höger vid korsningen före barriären och klättra upp på byggnaden med hissen på vänster sida av gatan. Från taket därifrån kan du se tråden försvinna in i ett förvaringsutrymme som är förseglat med en rulljalusi, samt en inaktiv kraftkärna på ditt tak med en kabel som löper till den där rulljalusin.
Rensa först bort alla fiender i området och prioritera Hiss-klustren. Titta sedan österut från kraftkärnans tak, gå åt det hållet och leta reda på de aktiva kraftkärnstationerna som sitter fast vid en obelisk på gatan nedanför och till vänster. Hoppa ner, ta laddningen och spring samma väg tillbaka till den inaktiva källan. Rulljalusin öppnas och noden finns därinne.
Det finns också en resurslåda på ett tak väster om den inaktiva kraftkärnan.

När alla tre noderna är nedtagna sänks barrikaden på evakueringsbyggnaden.
Gå in i Evac-byggnaden

Gå förbi orienteringspunkten och gå in. Förvaringslådan framför FBC-skåpbilen utanför innehåller uppdragsanteckning 1.
Lobbyn är full av döda FBC-rangers. Du kan rapportera kroppen i mitten av korridoren. Vid receptionen finns en garderob i hörnet, en evakueringsbroschyr på det blå bordet vid lampan och en resurslåda mellan disken och en säkerhetsdörr på nivå 2 som du inte kan öppna ännu. Kom ihåg den dörren.
I receptionen finns också en FBC-terminal, som kopplar Dylan till en agent med ett frågeformulär. Det är valfritt att fylla i det, men ger x1 Aberrant Shard, x1 Mourning Echo och Source. Det räknas som en World Feat, vilket låser upp prestationen ”Up to the Task”.
Ta hissen till 12:e våningen. Under resan berättar Zoe för Dylan att hon har läst hans akt och inte gillar vad som står i den, och en skakning utlöser ett flashback till Hiss-invasionen av Oldest House.
Gå ut ur hissen, aktivera orienteringspunkten och följ korridoren åt vänster förbi fler lik. I det blåbelysta rummet till vänster finns ”Sound Bath Sterilization Study”.
Nästa rum är en ”Arena Encounter” som sträcker sig över flera våningar där alla utgångar är förseglade. Dra bort Heavies från varandra där du kan, eftersom det är riktigt farligt att ta flera samtidigt i det här skedet. Du får hälsa antingen genom att döda grunts eller genom att ta de stora blå hälsoelementen som ligger utspridda. Vissa fiender går på väggarna, så du måste hoppa för att nå dem.
När barriärerna faller, leta på andra våningen efter en dörröppning som lyser starkt blått.
Spoilervarning! Allt nedan avslöjar den senare halvan av uppdraget, inklusive Dylans minnen av händelsen i Oldest House och vem som väntar högst upp i byggnaden. Sluta läsa här om du hellre vill upptäcka det själv i spelet.
Utforska 15:e våningen

När du har passerat den blå dörröppningen frågar Zoe hur många som dog i den händelse som FBC hela tiden återkommer till. Du får tre svar eller tystnad, men inget av dem förändrar något.
Gå ut på träställningen utanför nästa fönster och sväng höger. Hoppa över gapet till ställningen med den blå presenningen, titta sedan ner genom gapet för att se en avsats och gör en luftsprång för att nå den.
Stanna här. Om du svänger höger vid avsatsen nära nästa byggnadsställning och går in genom det öppna fönstret hittar du en resurslåda i hörnet och ett internt brev från FBC:s kommunikationsavdelning på skrivbordet.
Hoppa till nästa plattform, vänd dig om, hoppa till plattformen mot bakväggen, vänd dig om igen, spring sedan och hoppa till den öppning som lyser gult. En stor resurslåda står vid dörren i nästa rum, värd 1 hälsouppgraderingspoäng.
I korridoren därefter hamnar du i ett minne som P6, där du följer FBC-agenter tills en säkerhetsdörr fångar in dem. Tillbaka i nutiden aktiverar du orienteringspunkten förbi de Hiss-infekterade civila.
Hissen här hålls fast av en Hiss-nod vars tråd löper genom en låst dörr. Hitta den öppna dörröppningen längs väggen, följ rummet ut i korridoren och spåra tråden till noden. Uppdragsanteckning 3 ligger på bordet under affischerna, och en resurslåda står i hörnet bredvid den. Förstör noden.
När du återvänder till det stora rummet utlöses ett bakhåll av en Hiss Heavy.
Hiss Distorted. En svävande Heavy som blir nästan osynlig. Att attackera den bryter kamouflaget. Undvik dess konformade andningsattack och håll utkik efter förvrängningar i luften när den försvinner mitt i striden.
Ta hissen till 15:e våningen. Dylan berättar siffran för Zoe på vägen upp: 536 döda när Hiss intog Oldest House.
Ett annat minne spelas upp i korridoren, där FBC-agenter bekämpar Hiss. När du når dörren i änden återvänder du till nutiden och belönas med Source och x1 Distorted Form.
I det rödbelysta rummet med fältbäddar och svävande kroppar finns uppdragsanteckning 4 på skrivbordet vid väggen och En lapp till mamma på fältbädden vid dörren. Korridoren bortom det utlöser ett minne av Arish som förhör Dylan efter incidenten.
Hitta den överlevande

Ta dig igenom skakningarna tills du når ett stort rum fullt av civila som fångats av Hiss – det är källan. Någon syns i fjärran, och strax därefter hörs Arish.
Prata med honom. Han går med på att följa med, men vätskan som håller Hiss borta från hans huvud börjar ta slut, vilket sätter tidspress på resten av uppdraget.
Få ut Arish levande och fly från byggnaden

Gå tillbaka till hissen. Dörrarna sitter fast tills Arish tvingar upp dem, och när du trycker på knappen stannar hissen halvvägs: en Hiss-nod håller den fast. Hoppa ut och förstör den.
Fler trådar dyker upp, så Arish stannar kvar. Prata med honom först, för det är här han överlämnar nyckelkortet till nivå 2.
Följ det röda spåret till den närliggande dörren till nivå 2, öppna den och spåra tråden tillbaka till den stora arenan. Hoppa in, döda den noden och klara arenamötet som startar efter visionen.
Zoe rapporterar efteråt att Arish klarade sig levande.
Innan du går finns det på arenarummets översta våning en låst nivå 2-dörr som innehåller en resurslåda och uppdragsanteckningar 2. Tillbaka i lobbyn finns det vid receptionen en nivå 2-dörr som innehåller ytterligare en resurslåda och ett arkadskåp. SHUM III-arkadskåp har en utmaning som går att spela om med belöningar baserade på topplistor, men de förblir låsta tills zonen når en viss nivå. Det finns ett per zon.
När du når utgången i lobbyn avslutas uppdraget.
Belöningar för evakueringsprocedurer
Uppdraget ger 1 levande skärva, agentuniformen och trofén för räddningsuppdraget, plus nyckelkortet för nivå 2 som du plockar upp under flykten istället för i slutet.
Nivå 2-behörighet öppnar en rad dörrar i alla zoner, och flera av dem finns i områden som du redan har utforskat fullständigt. Bara evakueringsbyggnaden har två.
Vanliga misstag
Att ignorera Hiss-kluster. De läker allt i närheten. Inget annat i en strid spelar någon roll förrän de är borta.
Att bekämpa bepansrade fiender med skarp skada. Pansar bryts med trubbig skada. Din stridsförmåga täcker detta även om kross inte är din sekundära form.
Att slita på Hiss-transportörens kropp. Slå istället på de brytbara delarna på sidorna.
Att lämna snabbresedörren till evakueringszonen oaktiverad. Nästa uppdrag börjar tillbaka vid fältkontoret, och det är en lång promenad.
Att hoppa över nivå 2-dörrarna på vägen ut. Det finns två i den här byggnaden, varav en innehåller zonens arkadspel.
Vad du ska göra härnäst
Nästa uppdrag är ”Control Resonant Arish’s Briefing Walkthrough”, ett kort uppdrag som i princip består av ett samtal på fältkontoret, men det låser upp två uppdrag på en gång och lägger grunden för CFD-planen.
Nu är det också ett lämpligt tillfälle att ta en avstickare. Med Dominance, behörighet på nivå 2 och ett par zon-nivåer bakom dig blir både Central Resonant och West Incursion Resonant realistiska mål, och var och en ger ytterligare en stridsförmåga.


 Det har lyckligt kopierats... Tack för att du delar vårt innehåll!:



5% insättningsbonus upp till 100 ädelstenar

0% avgifter på insättningar och uttag.





11% insättningsbonus + FreeSpin


EXTRA 10% INSÄTTNINGSBONUS + GRATIS 2 HJULSPINN

Gratis case och 100% välkomstbonus


5 gratisfodral, daglig gratis & bonus

3 gratis casinos och en bonus på 5% på alla kontantinsättningar.

+5% till insättning




Kommentarer