


Final Fantasy Resonance Kapitel 4 Genomgång: Zoldaad slott, kejsar Sozhe och Dr. Lazarov


 Square Enix
 Fantasy
The second half of Chapter 4 is the payoff for everything Zoldaad has been building toward. The rebellion goes loud, the party breaks into the castle from underneath, and the man on the throne turns out to be a victim rather than a tyrant. It closes with a four-stage boss fight on a burning airship and the longest run of story in the game so far.
Banner Oath Part 2 Quest Overview
This half starts with the news about Prince Shera and ends with the Wild Rose flying over the capital. The weapons factory, the walkway maze, and the Ignis fight are in Final Fantasy Resonance Walkthrough: Chapter 4 Part 1.
Chapter | Chapter 4: Banner Oath (second half) |
Starting location | The Rebel Hideout, beneath the Zoldaad capital |
Main objectives | Rescue Prince Shera, reach the throne room, stop Lazarov |
Bosses | Emperor Sozhe with two Wraith Praetorians, Evan, Dr. Lazarov with three experiments |
Guest ally | Ignis, off-screen support during random encounters |
Permanent buffs | None in this half |
Ends with | Zoldaad liberated under Crown Prince Shera |
Six separate stat blocks appear in this half, four of them inside the final fight. The Lazarov battle is a stamina test rather than a puzzle, so item count matters more than party composition.
There is no shop and no Save Point between the castle roof and the deck of The Invincible, which is the one piece of planning this half actually demands. Everything you intend to spend on the last fight has to be bought in the hideout or looted from the dungeon cells. The chapter list sits in the Final Fantasy Resonance Walkthrough: All Chapters hub.
The Infiltration Plan and the Wild Rose

A rebel soldier arrives at the hideout with news that Prince Shera has been detained. Jake reads it as his father finding out that Shera has been working with the rebellion, which puts an execution on the table and forces the timetable forward. Shera is the piece the whole revolution depends on.
Nichol offers to put a plan together with him, which is the role he asked for at the end of Chapter 3 and the first time anyone takes him up on it properly.
While the two of them work, rest at the Inn and save. Then go to the office and speak to Jake to trigger the briefing.
The plan Nichol lays out keeps the frontal assault on the capital, but demotes it to a distraction. The real work goes to a small group entering Zoldaad Castle from underground, pulling Shera out and detaining Emperor Sozhe while the army looks the other way.
The whole rebel army is gathered for it, which is the first time the scale of what Jake has built is visible.
He then makes a speech about what the revolution means in the longer history of the country. Once the capital falls, he intends to fly the banner of the Wild Rose, the flag Zoldaad used during the years it was peaceful and prosperous, as a statement that it will be again rather than as a victory marker.
It is a better speech than the leader of a rebellion in a video game usually gets, and it sets up the reveal at the end of the chapter.
Buy whatever is left to buy at the hideout shops and save before leaving, because the next shop is on the other side of the chapter.
Zoldaad Castle Dungeon: Amelia and the Master Key

Leave through the tunnel entrance rather than the desert exit. Backtrack to where the party first entered the tunnel system and look at the left side of the first fork, where a gate was locked on the way in. It is open now.
Follow the path through to a new Save Point beside a ladder. Save, then climb. Detour right first and go through the unlocked gate at the end, where a cell holds a coffer. Then head back left and follow the path to the exit, which leads straight into the castle's dungeon.
For a moment it looks as though the party has slipped in unnoticed. Then a cage drops on them from above.
Dr. Lazarov walks out of the dark, delighted with himself for catching the rats that have been interfering with his plans in Zoldaad. Evan follows him in, still under control, chastises Lid for everything she has done, and then breaks into a laugh about finally being free to build airships and line his pockets with the proceeds.
Gas starts filling the room while they talk, and the party goes down with it.
They wake up some time later inside a guarded dungeon cell.
Lid talks about her brother without much left in her voice, having worked out that fighting him is no longer avoidable. Jake, characteristically, points out that being captured has put the group inside the building they were trying to break into, which he presents as part of the plan.
Amelia then drops in from above and kills the guard. She is Prince Shera's maid; she wants him out of here, and she confirms he is being held in this same dungeon and has not said a word about the rebels under questioning. She also calls Jake Lord Jake and moves on quickly when he brushes it off, which is worth filing away.
Once you have control, head left and up the central stairwell, then go directly up the next set of stairs in the section above.
In the section after that, follow the path left until a Save Point appears behind a locked gate. There is no way through it yet, so note where it is, walk past, and keep going left to the next section over.
Shera's cell is in the next section along, with a single guard outside it. He engages the whole party on his own while musing out loud that he cannot possibly let anyone take the master key he is carrying, the one that opens every cell in the dungeon, including Shera's. He is also one of the weakest enemies in the game, so a few hits settle it.
The master key is yours when he falls, and Jake uses it to open Shera's cell.
The short conversation that follows adds the detail that ties the chapter together. Shera says his father's behaviour changed dramatically after Lazarov arrived in Zoldaad, which recasts everything the rebels have been fighting. The Emperor they want overthrown may not have been making his own decisions for a long time, and the man who was making them for him is still in the building.
Shera asks to come along and does, though he does not join as a playable party member and never appears in the party menu.
Every Cell Coffer in the Castle Dungeon

The master key opens everything, which turns the dungeon into a looting exercise. Several cells also hold prisoners worth talking to.
Work down past Shera's cell to the section below, then back up and east through the remaining blocks, opening cells as you go. Here is everything the dungeon holds:
- 1 x Mist Turbo Ether, in the cell through the unlocked gate right of the first ladder
- Tablet Shard and a Pulse Cannon for Jake, in the section down the stairs past Shera's cell
- 2 x Phoenix Pinion, in the cell directly next to Shera's
- 1 x Turbo Ether, through the hole in the left wall of the imperial soldier's cell
- 1 x Phoenix Pinion, in the cell holding the two locals on the right
- 1 x X-Potion and 1 x Mist Ether from the Beefy Man, plus a Tablet Shard inside his cell
The Pulse Cannon is the first real weapon upgrade Jake has had since joining, since the hideout vendor was the only other source of guns.
The prisoners are worth the time on their own.
Releasing the imperial soldier gets you the tip about the hole in the left wall of his cell, which is how you reach the Turbo Ether next door. The old woman freed alongside the other local mentions, apparently in passing, that Zoldaad has two princes, which the chapter does not explain for another hour. And a prisoner in the lower section suggests checking near the Emperor's throne once you reach it, which is the only pointer you get toward one of the best weapons in the chapter.
Backtrack to the gated Save Point, unlock it with the master key, save and use a Tent. Then take the stairs on the left up into the castle proper.
Ignis as a Guest and the Captain's Quarters Choice

The party walks straight into Ignis on the main floor, which is becoming a habit. He is not here for a rematch. He is here to deal with Lazarov after the betrayal, and he suggests teaming up on the grounds that both sides want the same man.
Lid jokes that what he actually wants is someone to give him directions, and he does not bother denying it, which is consistent with everything he has shown so far.
Rain refuses to call him an ally. Ignis agrees with the refusal and comes along anyway, which is how Ignis joins as a guest. He does not appear in the party menu, he does not appear on the field, and he cannot be equipped, but he contributes damage from off-screen during random encounters for as long as he is around.
Approach the center of the area near the stairs and the party runs into Wraith Soldiers, the same husks from Kolobos Ruins. They are weakest to Light and have very little in their kit, so clear them quickly. Shera says goodbye to them as their bodies fade, which is a better scene than the fight deserves.
Keep running left and take the stairs at the far end up to the upper level. The first room on that side holds a rebel in a stolen uniform, one of Jake's moles, who hands over 1 x Turbo Ether. There is also a coffer in the back-right of that room.
The throne room sits in the center of the upper level and is locked. Shera knows where the key is: the Captain's Quarters at the far right end of this hall. Save at the Save Point by the throne room doors before going for it.
The Captain threatens to stop the party on sight. Shera steps in and asks him to stand down and hand over the key, and Ignis offers the alternative of beating it out of him. The choice is yours. Siding with Shera lets the prince talk him into handing it over without a fight, which is the cleaner outcome and the one the walkthrough took.
Before leaving, open the coffer in the back-left corner for the Kikokusenga, a weapon for Lasswell.
Head back to the throne room doors and save again.
How to Beat Emperor Sozhe

Inside, Emperor Sozhe is hunched over on his throne. Shera calls out to him and gets nothing back, and Lazarov enters cackling about how well his experiments have turned out. Ignis calls him out and gets scoffed at for working with Rain.
Lazarov sends a group of Wraith Soldiers forward and Rain dismisses them as barely a threat, which Lazarov agrees with cheerfully. Then he mentions that he has other monsters available, and the focus shifts to the throne.
Sozhe is one of the experiments. He has been for a long time, which answers every question the rebels have been asking about him, and the only thing left to do for him is to end it as painlessly as possible. Lazarov uses the moment the party spends absorbing that to leave the room.
Emperor Sozhe is Level 30, weak to Water, and drops an X-Ether. He opens the fight flanked by 2 x Wraith Praetorians, which are weak to both Water and Stone.
This is the first boss since Ignis that punishes a slow opening, and the party has had no shop since the hideout, so go in with buffs rather than trying to out-damage it.
Clear the Praetorians first, the same way every escort fight in this game works.
Their attacks are mostly physical, with Slash as the standard, and some of those hits carry Poison. Keep a cleanse available rather than letting it stack across three characters while you are trying to manage the Emperor as well.
Sozhe himself has a far nastier kit. Fira and Gravity are the regular pressure, Bio lands Poison on one or more characters, and Hell's Pillar is the one that ends runs, hitting the entire party for massive damage.
Play it the way you played Ignis. Stretch the party's turn cycle as far as it goes and keep Sozhe's turns to a minimum, using Nichol's Strategem and Lasswell's Null Moon to tear through the stagger meter. The more often he is staggered, the fewer times Hell's Pillar comes out.
Below 50% health he summons three more Wraith Praetorians, so be ready to clear a second wave. Keep both HP and MP topped up throughout, since Water is doing all of your damage and running dry is the main failure state.
He comes back to himself when he falls, and the scene that follows is the reason the fight is written the way it is.
With Lazarov gone, whatever was controlling him lifts. He recognises Shera, understands what his reign did to the country, and carries the weight of it. Shera promises to pick up the pieces and lead Zoldaad somewhere better, which gives him enough peace to go quietly. Amelia arrives as it happens.
Jake tries to console Shera and gets told the tears can wait until later, which is the most Shera thing in the chapter.
Ignis announces that he is going his separate way to track Lazarov down, which ends his time as a guest and takes his off-screen damage with him. The next objective is the castle roof, because the revolution is not official until the flag is up.
The Castle Roof and How to Beat Evan

Speak to Amelia and she points at the route on the left side of the throne room as the way up.
Before taking it, check the left side of the throne itself. A coffer sits behind the grassy hedge there holding the Kaiser Sword for Rain, which is what the prisoner in the dungeon was pointing at.
Out in the hallway, run left past the stairwell to a coffer at the far end holding 1 x Mist Turbo Ether. Then go back and take the stairs all the way up.
There is a Save Point waiting on the roof, which is the last one before the end of the chapter. Use it properly, because everything from here to the credits of Chapter 4 happens without another one.
There is also someone waiting.
Lazarov is unimpressed that the party beat Sozhe despite everything he did to enhance him. His remaining shield is Evan, and he explains exactly what he did to him. The behaviour is scientific brainwashing, deliberately applied without the physical enhancements, because damaging Evan would have compromised his skill with airship machinery.
He then forces Evan to laugh at his own sister purely to see what it does to her, and it sends Evan into an uncontrolled spiral of laughter and more talk about money.
One phrase slips out of the middle of it, something about money for Lid, and she catches it even though nobody else does. Lazarov uses the spectacle as cover to escape back aboard The Invincible, leaving Evan behind with orders to dispose of her.
Lid works out what the fight has to be. She is his sister, so she is the only one with a chance of reaching him, and she accepts that reaching him might take hurting him.
Lid takes the fight alone, because she is the only one he might still hear.
Evan is a scripted fight with Lid as the only character in the party. He carries a small knife and uses Stab and Cut, with the occasional Thunder. None of it does meaningful damage at this level, which means there is no healing to manage and nothing to plan. Reflect works against the Thunder if you want to use it, and basic attacks are enough to carry the whole fight.
He comes back to himself partway through the fight and is horrified at what he has been doing.
The flashback explains the money, which has been the one thing about him that never fit. Back in Dilmagia, the imperial army threatened to fire both of them unless they built warships. Lid refused and stormed off, and Evan stayed behind and talked the soldier into keeping his own job at double the pay, on the condition that Lid could carry on building airships however she liked.
The money was always for her. Every line he delivered under Lazarov's control about lining his pockets was built on top of something he did for his sister.
The guilt sends him walking toward the castle battlements, brainwashed or not, until Jake steps in and forces him to think about what leaving would actually do to Lid.
He agrees to live with it and see the dream of bringing airships to the world through instead. Then he mentions something he has been working on in secret the entire time Lazarov had hold of him.
The Enterprise, Bahamut and Boarding The Invincible

The scene moves to a hangar holding the airship Evan and Lid have been building since childhood. It is finished, with help from him and the dwarves, and it is called The Enterprise. He hands it to Rain and the others so they can go after Lazarov.
That solves the problem of how to reach Lazarov, and the group takes to the skies within the scene.
The chase takes The Enterprise after The Invincible, and partway through it, Fina says she can sense something approaching.
What arrives is Bahamut, descending through the clouds to fire on The Invincible and damage it badly enough that the smaller ship can catch up and board. He leaves immediately afterward, and Fina says she feels as though she has seen him before, which is true in a way she cannot remember.
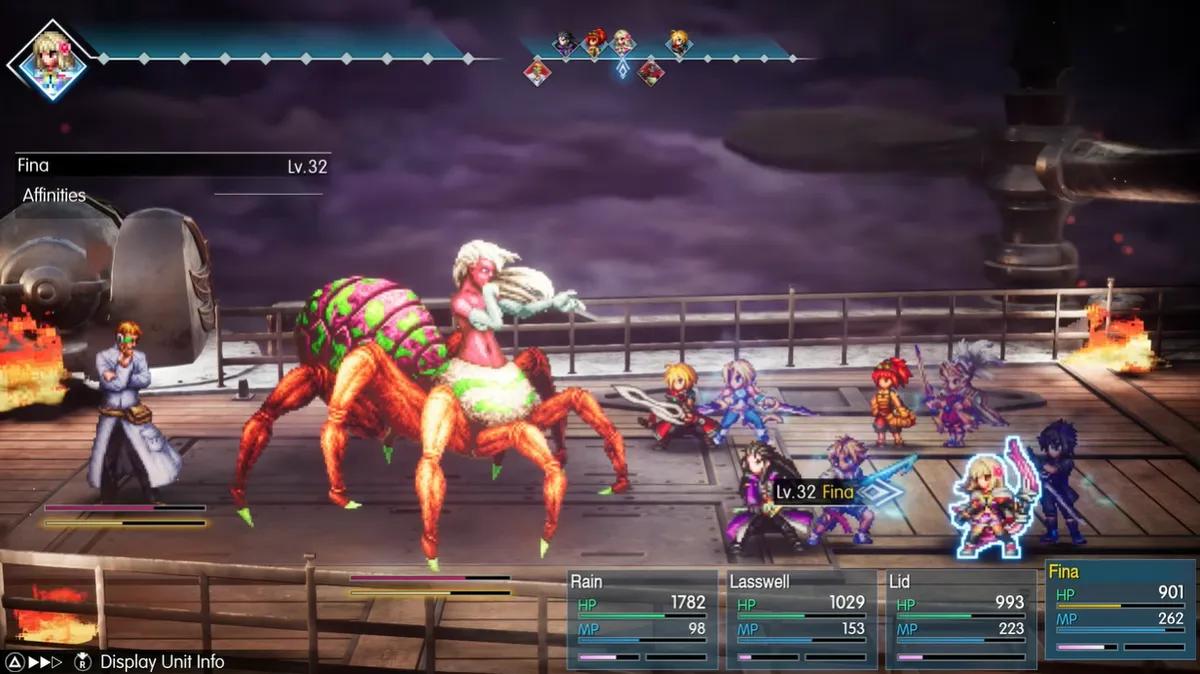
The party boards the burning deck and corners Lazarov, who is not remotely concerned about being cornered.
He explains his actual ambition for the first time, and it is larger than anything he has done so far. He intends to rule the world outright from the deck of The Invincible, using the Crystal Cannon he forged as a hammer he can bring down on whichever continent displeases him.
He also wants to live forever. Working alongside a group of people who have been alive for several centuries appears to have given him ideas.
How to Beat Lazarov's Three Experiments

The structure of this fight is unusual. Lazarov is the boss and can be targeted from the opening turn, but he hides behind his experiments and should be dealt with last.
Those experiments are not minions in the usual sense. Each one is closer to a boss in its own right, with its own stat block, its own elemental weakness and enough HP to take real turns to clear.
They also provide Lazarov with no direct benefit beyond being bodies between him and the party, which the game reflects by having his resolve waver visibly as each one falls.
He does not sit idle either. He throws Aeroga and Blizzara at the party throughout, hands his experiments small heals worth a few hundred HP, and buffs them with things like Bravery. Nichol can dispel those, and should.
He does not sit idle while his experiments work either. He throws Aeroga and Blizzara at the party throughout all three stages, which is why mitigation has to go up before the first experiment rather than between them.
Open with Shellga and Protectga plus the Bulwark Formation and keep all of it running for the entire fight.
The three experiments, in the order he sends them out:
- The Hunger v5 is Level 30, weak to Light and Fire, and carries a pair of Earrings worth stealing
- Test Subject No. 9 is Level 30 with 18,000 HP and is weak to Water
- No. 999 carries 24,000 HP and is weak to Wind
The Hunger v5 is the weakest of the three and should be familiar from Kolobos Ruins. Its physical attacks are unremarkable and the thing to watch is Doom, which marks a party member and kills them three turns later. A Remedy clears it, and if you do not have one, have a resurrection ready. It also lands Poison, so keep Esuna or Antidotes available, and otherwise burn it down with Light and Fire.
Test Subject No. 9 is a Demon-type and leans on status ailments rather than damage. Slow, Charm and Petrify all appear alongside its physical attacks, and the correct answer is to kill it quickly with Water rather than cleansing everything it throws.
No. 999 is the one Lazarov calls his crowning achievement, and it is less dangerous than it looks. Fist of Fury, Thwack and Charge make up its kit, with Thwack hitting the whole party, and none of it lands hard through Bulwark or Protect. The complication is Lazarov reinforcing it with Mighty Guard and Bravery, so dispel what you can and push Wind damage into the stagger meter.
One note on No. 999. The in-game stat panel lists a level and an elemental weakness that contradict the fight itself, which describes a 24,000 HP enemy that takes extra damage from Wind.
Wind is what works. Bring it regardless of what the panel says, and treat the listed level as unreliable rather than as a sign that this one is easier than the two before it.
How to Beat Dr. Lazarov and End Chapter 4

With no experiments left to hide behind, Lazarov injects himself with Blitz Blood to boost his own stats and takes the field properly.
Dr. Lazarov is Level 30 with 45,000 HP, the largest health pool in the fight, and he is weak to Stone. Unlike most late bosses he is also susceptible to Poison, Blind and Sleep, so those are worth landing if you have them.
Lid is the obvious damage dealer here, along with any Vision carrying Stone, which is the one element she has had to herself since Dirnado.
His moveset does not change much from the earlier phases. He keeps throwing strong magic attacks, keeps trying to land Sleep on the party, and keeps buffing himself whenever he gets a free turn, so keep dispelling rather than racing him.
Beyond that it is attrition against the biggest health pool in the fight, which is why the item count mattered on the way in.
Cornered, he aims the Crystal Cannon at Zoldaad itself and taunts Jake about losing his little brother. That lands as a reveal for the party rather than for anyone who talked to the old woman in the dungeon. Jake confirms it: he is Shera's half-brother through Emperor Sozhe, with a different mother than the Empress.
Jake shoots him in the shoulder and the remote hits the deck. Ignis arrives, Lazarov begs him to fire the cannon instead, and Ignis informs him that he destroyed it already. That gets Lazarov mocking him, which gets him backhanded off the deck to his death without ceremony.
Ignis declares the truce over, refuses Rain's offer of a fight on the grounds that it keeps better for later, and leaves.
Lid suggests taking The Enterprise back to Zoldaad to see what is left of the capital. What they find is celebration, and the Wild Rose flying over the castle. Zoldaad is liberated, with Crown Prince Shera about to take the throne, and the chapter ends as the party flies back into the city.
That is the end of the current walkthrough coverage. Final Fantasy Resonance Walkthrough: Chapter 5 picks up from here once the chapter is available, and the Final Fantasy Resonance Walkthrough: All Chapters hub carries the running order.
Common Mistakes to Avoid in Chapter 4 Part 2
Running past the locked gate in the castle dungeon. The Save Point behind it only opens once the master key is in hand, and it is the last save before the Emperor Sozhe fight.
Skipping the prisoner cells. The master key opens all of them, and they hold a Tablet Shard, a Pulse Cannon for Jake, two Phoenix Pinions, a Turbo Ether, an X-Potion and a Mist Ether, plus the hint that leads to the Kaiser Sword.
Missing the coffer beside the throne. The Kaiser Sword for Rain sits behind a grassy hedge on the left side of the throne, flagged only by a prisoner's offhand comment several rooms earlier.
Letting Hell's Pillar fire repeatedly. Sozhe's party-wide attack is the one that ends the fight. Keeping him staggered is what keeps it off the board, so stagger skills beat raw damage here.
Healing during the Evan fight. He uses a knife and the occasional Thunder, and none of it threatens Lid at this level. Items spent there are items missing from the Lazarov fight.
Fighting No. 999 with Ice. The stat panel and the fight itself disagree. Wind is the element that works on it, whatever the panel lists.
Arriving at The Invincible low on items. The final fight is four separate enemies back to back with no break between them, and there is no shop or Save Point between the castle roof and the deck.
Forgetting to dispel Lazarov's buffs. He hands Mighty Guard and Bravery to his experiments and buffs himself once they are gone. Nichol strips all of it, and leaving it up turns a long fight into a much longer one.


 Det har lyckligt kopierats... Tack för att du delar vårt innehåll!:


Kommentarer